Free Personalized Tic Tac Labels

Okay everyone, I hope you are ready for the latest free templates! I am really excited about these. I  have been thinking a lot about favors and how they can be so expensive. That’s why I created these templates. These are labels for Tic-Tac boxes. I created the labels in Microsoft Word, so they would be easy to edit.


The Word documents are attached below, and they are fully editable. But before we get to them, have you heard about us? We are Bridal Party Tees, and if you want to make hilarious custom tank tops for your Bachelorette Party, then you have come to the right place! We hope you check us out. Now onto the labels…


1. Peel off the original Tic-Tac label. You may need to use a warm wash cloth to get all the glue off but make sure you don’t get any water in the box.

2. Choose from one of the Bridal Party Tees design templates. You can edit the text in Microsoft Word.

3. Print out on 8.5×11, white full label sheets. You can buy these at any office supply store

4. Cut along the dotted line.

5. Peel off back and place on the bottle in the desired location. This label is sized to fit on the front or back of the Tic-Tac box.

Floral TicTac Template
Polka Dot TicTac Template
Stripe TicTac Template

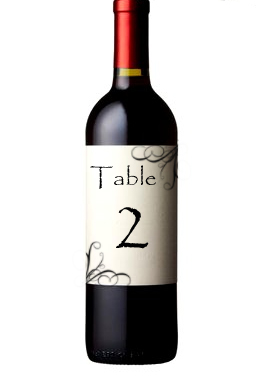
Free Wine Bottle Templates: Table Numbers

wine bottle

Brides, we’ve updated this post with great wine label design templates that you can edit yourselves! See the DIY instructions and files below.

Finding table numbers that are not going to fly away at an outside wedding can be a challenge. That is why I created these wine bottle labels. These wine bottle labels serve double duty at a wedding. They tell the guests where to be seated as well as treating them to a nice glass of wine. The best thing about these table numbers is that even if the guests drink the whole bottle, they are not going to fly away!

DIY:
1. Soak your bottles in a full sink of warm water, or you could use a tub to do many at a time. Soak for about an hour, then peel off original label. Scrub off remaining glue.
2. Choose from one of the Bridal Party Tees Wine Label design templates. You can edit the table number text in Microsoft word to make as many as you need.
To recolor in Microsoft Word: Click on the design to activate it then click on the format tab and then the recolor drop down menu. You can pick custom colors to recolor the background or the design and then you can change the live text to match.
3. Print out your chosen wine label template on 8.5×11, white full label sheets. You can buy these at any office supply store.

4. Cut along the dotted line.

5. Peel off back and place on the bottle in the desired location.

Check out our “ready to use” design templates below:
Orig Scroll Wine Label Template
Scroll Wine Label Template
Sketchy Scroll Wine Label Template
Circles Wine Label Template
Beaded Oval Wine Label Template
Beaded Wine Label Template

Twitter

Save the Date Postcard Template


post card

 I have to say that I am simply obsessed with all the  templates you can find on the Wedding Chicks blog. Like this breathtaking Save the Date postcard. This is such a fun and unique save the date that guests will really enjoy. I also, love the vintage feel of the postcard. I am sure all of you vintage lovers are simply swooning. I know I was! To get this template simply click here to be re-directed to the Wedding Chicks blog!

Thank You Card Idea~Thank You Tees

thanks

pic

Here is a super cute idea for your thank you cards! Instead of the traditional thank you cards, get shirts made that say it. You could make the shirts as pictured above or have the grooms shirt say “thank” and the brides say “you”. You can design your shirts here. After your receive your shirts, have a friend take digital pictures of you and the groom in them. Upload your favorite to a computer and print onto photo paper.Then you can put the picture through a sticker machine and adhere to a blank size-A6 postcard. You could also have the pictures printed on sticker paper to skip the sticker maker step. Another option is to go through a photo printing company and have the picture printed directly onto postcards. Keep in mind this will save you a ton of time, but will also cost a lot more money. Start making you shirts!

source

Guest Book Alternative ~ Storyline

Here is a wonderful wedding idea from Project Wedding. In lue of a guestbook you can create a storyline. I love this idea because instead of collecting a list of names this allows your guests to share a story about the couple. This makes the process more intimate and wonderful for the bride and groom. They can look back on the stories and read the memories that their guests hold dear. It is also a fun way for guests to really get to know the couple. They are sure to have fun reading all of the stories that people remember. For more pics and directions click here!

 storyline

Wedding Fan Template


fan

fan template

Here is an easy DIY favor that will keep your guests cool on a hot summer day. Plus, it is a great way to just say thank you in a simply and fun way. To create this fan you will need heavy cardstock (two pieces for each fan), large craft sticks, spray adhesive, scissors, fan template and a color printer. Simply click on the fan template and print on cardstock. You will need to print the template twice. So, there is one on the front and one on the back. Make sure your printer is set on high quality printing. Cut out the designs. Next, lay one piece of cardstock facedown and glue the craft stick to the paper. Make sure the craft stick is almost to the middle, but has an enough room for someone to hold at the bottom. This will allow for extra support. After, the craft stick is in place glue the other fan design on top. Now you have a beautiful fan! So easy and fun. Enjoy!

Free Stir Stick Template

stir sticks

pic

I love personalized stir sticks. They are a great way to add a personal element to your wedding. They are a small detail that is sure to impress your guests. It is also another little way that you can show gratitude or send a personal message to your guests. That is why I created these cute little templates. To create your stir sticks simply right click on the design that you like. You can then choose to save the file and print it from there or you can copy and paste the image into Microsoft Word or Photoshop. If you choose this option you can paste multiple images on one paper to reduce the use of paper.  After you have your images, cut them out and attach to a stir stick or straw with double sided tape. You could also choose to print the template on sticker paper to make it easier to attach. Enjoy!

best wishes 1

best wishes 2

thank you

thank you 2

love is sweet straw

sweet

love is sweet3


Twitter