EggShell Lovelies


eggs

If you are looking for a unique table arrangement, I have just the thing for you! These hollowed-out eggshells make a naturally beautiful vases for tiny flower arrangements. Break an egg at the top of its shell, drain the contents, and carefully rinse out the inside. Next, fill the empty shell with room-temperature water and place it in an eggcup for stability. Finally, insert small cuttings of your favorite blossoms ( lilacs, lily of the valley, and violas are pictured above). Individually or grouped together in a centerpiece, these tiny arrangements make a wonderful addition to the place settings at your table.

source

Beach Bum

beach

Having a wonderful beach themed centerpiece is as easy dumping your sand pail. Simply indulge yourself in a day at the beach. After a day at the beach, bringing the ocean home is as easy as emptying your pockets. The designers of this centerpiece  collected shells, starfish beach grass, and sand to create a sandsational display! And these materials last, so you can start preparing the centerpieces of your wedding in advance. source

Bounty of Beans

beans

Daring designer Genevieve Gorder works decorating miracles on The Learning Channel’s Trading Spaces , and she did the same with this centerpiece. If the design alone is not good enough,then the price will be.  She made this arrangement for about $6! The ingredients: a cheap bunch of supermarket flowers, a bag of colorful dried beans and some tall glasses drinking glasses. Fill each glass with a 2- to 3-inch layer of beans and add a few tablespoons of water. Trim one flower stem to fit inside each glass, then arrange the “vases” down the center of the table. Wah-La! You have a beautiful centerpiece at a fraction of a florist’s price!

source

Jello Centerpiece?


jello

J-E-L-L-O, has been the catch phrase of Jello for years. I have seen many uses for Jello, from cakes, to salads, to  drinks, but this is a new one. You can now use the jiggley mix to make a beautiful centerpiece for your wedding,wedding shower, or luncheon. To create this look simply combine six boxes of Jell-O powder with half the amount of water specified, chill the mix in a glass vase for half an hour, then just push flowers into the semi-firm gelatin. You can design your own in any color!

source

All Sewn Up!

colors

Here’s a good excuse to splurge on sewing supplies! David Stark an event designer and author of the table-setting guide Napkins with a Twist designed this colorful display. Get this look by simply slipping spools of embroidery thread over test tubes to create homespun bud vases. Mix and match, or stack up a single color for dramatic effect. Either way, you’ll have this centerpiece all sewn up in minutes. This is a quick and easy centerpiece idea for weddings, wedding showers, and bridal luncheons.

source

Candyland Centerpiece

kids candy

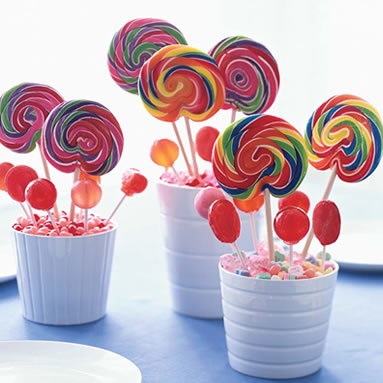
Decorations for the kids tables are often hard to find. You can not have something breakable. Also, you probably do not want to spend a ton of money on a flower centerpiece from your florist, since the children will not even care what they look like.  One option is to make a colorful centerpiece out of candy. The kids are sure to LOVE this centerpiece. Plus, it can serve as their favor as well. Dylan Lauren, owner of confection megastore Dylan’s Candy Barmade made this sweet centerpiece. To create this look simply fill plant pots with Conversation Hearts, jelly beans, rock candy and Red Hots and nest lollipops in the mix. It’s beautiful and a sure fire hit with the kids! 

source

Get the Look~Spring 2009 Smoky Cat Eye

cat eye

FACE:
For this look, the skin was smooth and flawless. Start by applying PHOTO FINISH FOUNDATION PRIMER all over using fingertips, then apply HIGH DEFINITION HEALTHY FX FOUNDATION using FOUNDATION BRUSH #13. Warm CAMERA READY FULL COVERAGE FOUNDATION on the back of your hand, then blend under eyes and over any imperfections using CONCEALER BRUSH #4. Give cheeks a natural bronze flush by dusting on FUSION SOFT LIGHTS in BAKED STARBURST using BLUSH BRUSH #16.


EYES:
Using DEFINER BRUSH #15, apply a soft wash of CREAM EYE LINER in MIDNIGHT BROWN, making a thin line starting at the first lash and thickening as you reach the outer corner, winging up and out slightly. Fade color out to the outer corner – there shouldn’t be any color in the inner part of the eye. Blend EYE SHADOW in BRAZILIAN BRONZE over the liner using CREASE BRUSH #10. Using DOUBLE-ENDED SMUDGER BRUSH #20, sweep CREAM EYE LINER in MIDNIGHT BROWN along lower lashline, focusing the intensity at the outer corner. Add sultry definition by softly blending EYE SHADOW in WALNUT in the outer corners, and sweep along lower lashline using DOUBLE-ENDED SMUDGER BRUSH #20. Complete the eyes with a coat of BIONIC MASCARA.


LIPS:
Balance dark eyes with a creamy nude lip – apply PHOTO FINISH LIPSTICK in ELEGANT, followed by a dab of LIP ENHANCING GLOSS in CRYSTAL.
SOURCE AND MORE PICS

Yummy Mousse from Tartelette

What good would the up coming holiday be if I could not use it as a chance to talk about sweets? None! Valentine’s Day is all about chocolate and sweet concoctions. That is very evident when you check out Tartelette’s blog! The following sweets are for the person with a true sweet tooth. They are a combination of chocolate and sweet and silky mousses. They make me hungry just looking at them! Plus, if you check out the site Tartelette tells you just how to make them. Yummm!!!!!

Chocolate

Milk Chocolate & Chestnut Mousse Verrines,Nougatine Cups with Vanilla and Star Anise Mousse, Chocolate Espresso Mousse Cakes , and Chocolate Tuiles and Bailey’s Cream