Are you having an ice cream bar at your wedding? If so, check out these super cute labels from Eat Drink Chic. I LOVE them! I don’t think I need to say anymore. They simply speak for themselves! To download these cute labels click here to be redirected to Eat Drink Chic.
Month: August 2009
Wedding Favor Cone Template
Here is another fabulous template from Martha Stewart. To create this favor cone you just need the favor cone template and directions, crate paper, card stock, a high quality printer, ribbon, and some goodies to stuff in the cone. These make an absolutely gorgeous favors. Stuff them with candies, nuts, or other goodies. These would also make great holders for bird seed or rose petals for your grand exit. The possibilities are endless! Have fun and enjoy. To get the directions and template, simply click here.
DIY Favor Boxes from Style Me Pretty
Get the Template and Directions!
I love Style Me Pretty! Abby features the most fabulous weddings and great DIY projects. This is a simply adorable favor box idea that was created by the Style Me Pretty DIY guru Kathleen. She does wonderful work. Don’t you think? To get the pattern and directions for this pretty little design simply click here to be re-directed to the Style Me Pretty website.
DIY Macaroon Thank You Bags
The Wedding Chicks have some of the most gorgeous ideas featured on their site. Take these macaroon thank you bags for example. I love how the macaroons are the same color as the wedding colors and the thank you stickers are precious. You can get the full instructions to make these cute favor bags and the sticker templates by clicking here. Enjoy!
Thank You Card Idea~Thank You Tees
Here is a super cute idea for your thank you cards! Instead of the traditional thank you cards, get shirts made that say it. You could make the shirts as pictured above or have the grooms shirt say “thank” and the brides say “you”. You can design your shirts here. After your receive your shirts, have a friend take digital pictures of you and the groom in them. Upload your favorite to a computer and print onto photo paper.Then you can put the picture through a sticker machine and adhere to a blank size-A6 postcard. You could also have the pictures printed on sticker paper to skip the sticker maker step. Another option is to go through a photo printing company and have the picture printed directly onto postcards. Keep in mind this will save you a ton of time, but will also cost a lot more money. Start making you shirts!
DIY Wedding Favor: Mini Candy Cartons
Are these not precious? Everything from Eat Drink Chic is simply lovely! Especially these milk carton favor boxes. I love how these boxes are fun and have a touch of whimsy. The kissing couple with the speech bubble reminds me of a super classy comic strip. I love it! These favors are sure to strike a conversation at your wedding, and I am sure no one will leave these behind! To get the template for these favors and step-by-step directions click here to be re-directed to Eat Drink Chic!
Guest Book Alternative ~ Storyline
Here is a wonderful wedding idea from Project Wedding. In lue of a guestbook you can create a storyline. I love this idea because instead of collecting a list of names this allows your guests to share a story about the couple. This makes the process more intimate and wonderful for the bride and groom. They can look back on the stories and read the memories that their guests hold dear. It is also a fun way for guests to really get to know the couple. They are sure to have fun reading all of the stories that people remember. For more pics and directions click here!
Favor Box Template
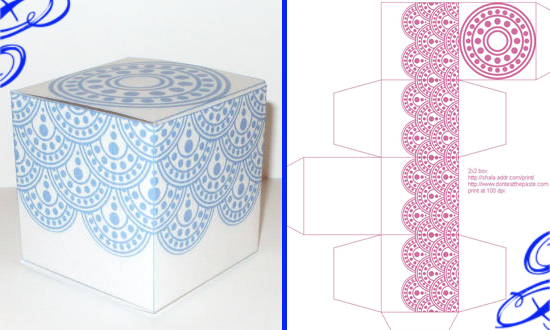
Here is a super cute template from Don’t Eat the Paste. These little favor boxes are super cute and would make a great favor for your wedding or shower. I love the design and the fun colors that are available. To go to these templates simply click here.
Wedding Fan Template
Here is an easy DIY favor that will keep your guests cool on a hot summer day. Plus, it is a great way to just say thank you in a simply and fun way. To create this fan you will need heavy cardstock (two pieces for each fan), large craft sticks, spray adhesive, scissors, fan template and a color printer. Simply click on the fan template and print on cardstock. You will need to print the template twice. So, there is one on the front and one on the back. Make sure your printer is set on high quality printing. Cut out the designs. Next, lay one piece of cardstock facedown and glue the craft stick to the paper. Make sure the craft stick is almost to the middle, but has an enough room for someone to hold at the bottom. This will allow for extra support. After, the craft stick is in place glue the other fan design on top. Now you have a beautiful fan! So easy and fun. Enjoy!
Share Your Bridal Party Tees with Your Friends on Facebook
I am very excited to let you all know that we have added a new feature to Bridal Party Tees that allows you to share your designs on Facebook. Now you can share your wedding tees with all your friends and family on Facebook. Plus, this will make arranging a bachelorette party a lot easier for all you maid of honors out there! There are two ways to share a design with your friends on Facebook.
From Design Center
Create your Design and then click the “Save Design” Button
Then on the save screen check the “Post to Facebook” box and click save. Check to see that it posted to Facebook and you’re all set!
From the Community Gallery:
Click on the design and then select “post to facebook”
After you have clicked Post to Facebook you will be prompted to sign into Facebook if you are not already signed in. Enter your Sign in information and continue.
Click Publish and your design will be sent to Facebook.
Check your Facebook Wall and you’ll see that it’s Posted! Now you are ready to start sharing all of your wonderful bridal ideas with your friends and family on Facebook. Have fun and start sharing!